The following is a movement practice devised by Srikanth Narayanan, which I have practised myself, usually daily, for many years.
I offer this only as documentation of a personal practice. I must emphasize that what is written here cannot be equivalent to a class and being held and facilitated by a skilled teacher. This is not intended as a series of instructions to follow.
Introduction
What follows is a description of a sequence of movements intended as a regular practice. It can be a rich when facilitated by a teacher in a (somatic) movement education setting so that the different layers of awareness and subtleties can be highlighted.
The sequence is a series of tentative invitations to come into relationship with your body in movement and integrate all that is happening into a moving whole.
The movements suggested are proposals. They may feel familiar or not. In combination, they are designed to release, energize and connect the body in movement.
The emphasis here is on functional movement around the spine, linking the centre to the periphery, developmental movement patterns and body systems. Although no technical knowledge of any of these is necessary an awareness of these aspects can enrich the experience of these movements. Allow yourself to find your own way through these structures rather than seeing them as forms to be mimicked. Where possible I have given what I feel are the significant points in each movement to support a focus of attention.
Each of us has a different body and with them differing needs and capabilities. None of what is proposed in this sequence comes with an implied standard of perfection. The movements are simply friendly challenges so that you can perceive your body in different ways and this is achieved in the process of working rather than in the end result. Keep it simple and easy. Enjoy the opening of awareness coming from your moving body. Find the pleasurable and easy way to move and keep a distance from pain, strain and the effortful.
Where variations are given, this is only to invite a different focus of attention rather than to create a hierarchy of forms or to say what is good or bad. Allow yourself to play with all of the variations, noticing your habits and preferences, so that you can choose to do movements differently and notice how this affects your bodily sense of what you are doing.
Find an environment in which it feels comfortable and easy to move, if necessary changing what you need beforehand.
Give yourself plenty of space, with at least enough room to lie flat on the floor and roll to each side unimpeded.
You may want to make sure the floor is clean, the room is quiet, and is warm enough but well ventilated. You may want to let others know that you do not want to be disturbed while you are moving.
The individual movements are not postures to be laboured. Do them with as much ease as you can, finding the ‘kinaesthetic delight‘ (after Barbara Dilley, See also her book This Very Moment) in your experience of your moving body.
Allow yourself to flow through the sequence gently, finding your own fluid transitions to keep yourself going with ease rather than determination. The more space you have the easier this will be.
Spend as long as you need in each movement without feeling you need to rush through. Repeat as you wish. There is much to be appreciated in repetition of the cycle.
Be aware of your breath as you move. You do not need to control your breathing or change it for any movement. Your body will know what it needs to do and you may simply listen to it. Breath is one of the body’s greatest resources, the source of our living movement, and a clear indicator of what is going on in our bodies.
So, allow yourself to sigh, yawn and to vocalise as you need. If sound comes up, let it happen.
I call this a cycle because the joy is that through regular practice of the same sequence I have continued to discover more layers of sensation in my body giving me information about how it moves, the connections through my anatomy and the environment, and the way that I can find resources in my body and balance rest and energetic movement. In other words, I never feel that I am repeating the sequence but rather always learning from my body through the same practice. There is a special joy in discovering new aspects to even the most simple movements which were probably there every time I have done them but waiting to be witnessed. I offer this to you so that you through your bodily wisdom you can see what you see.
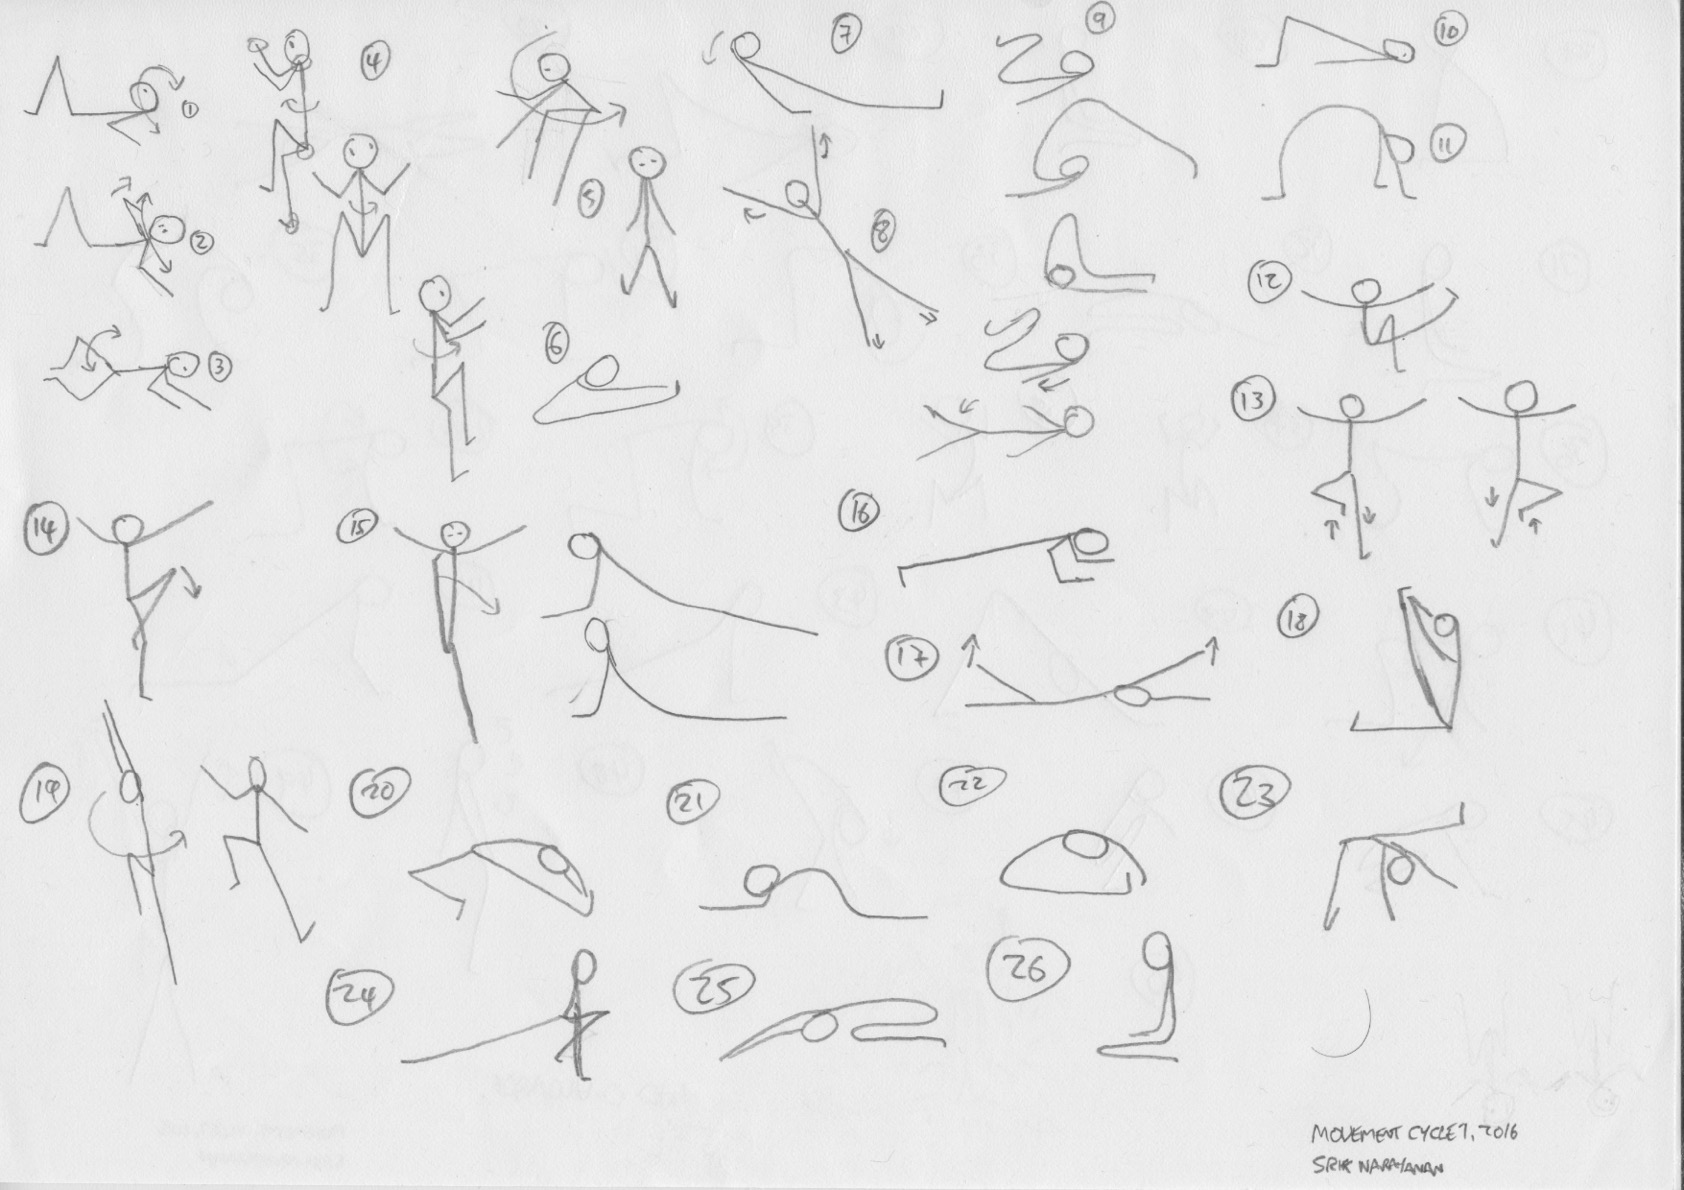
MOVEMENT CYCLE 1
Preparation: Coming to rest on the Earth
Do what you need to prepare before finding your way to lying on the floor on your back with your legs bent at the knees and the feet flat on the floor, so that your knees are in a way standing up from the floor restfully, eithout lots of effort or tension.
Place the fingers of both of your hands on the tissues behind your neck and gently slide your hands up towards the crown of your head, your palms brushing past your ears, and away. Do not lift your head but allow it to fall into your fingers, feeling its weight. Repeat this a few times so that the tissues at the back of the neck might lengthen and your head rests comfortably on the floor.
Leaving your head where it is, lift your pelvis a tiny bit off the floor and let it fall gently back to the floor so that it rests comfortably. You can use your hands to slide downwards over the tissues of the buttocks, like you did with your neck and head but in the opposite direction.
Slide your feet closer and further away from your pelvis to a point where it feels that your feet are flat on the floor and your knees can stand up without any effort in your upper or lower legs, so that they feel like they are floating up. Adjust your feet so that they are about hip-width apart. If you need to grip your hips or legs to maintain this, move them apart to a point so that they do not fall inwards or outwards and the knees stand without effort. Lift your feet a little away from the floor and let them drop softly and gently back to the floor so that your legs rest comfortably.
Massage the tissues of your face and head, enlivening the tissues with your fingers and feeling the life in your fingers too. Spend a few minutes on this.
Close your eyes. Let your eyes rest in the fatty pads at the back of the eye sockets. Feel the weight of your eyes in the sockets.
Let your hands rest over your eyes with the heels of your hands resting on your cheek bones and your fingers resting on your forehead, pointing up towards the top of your skull, your elbows floating up over you, close together. Feel the weight of your hands and the weight of your skull.
Bring your attention to your breath. Feel any movement you sense as you breathe.
Keeping your eyes closed, move your hands to either side of your upper chest, just beneath your shoulders. Feel how your hands move with the breath. Breathe into your hands.
Move your hands a little lower down the chest, so that the little fingers are around the bottom of the ribcage at the front. Feel how your hands move with the breath. Breathe into your hands.
Then move your hands down to your belly, with your elbows resting on the floor. Feel how your hands move with the breath. Breathe into your hands.
Letting your elbows and upper arms remain where they are resting on the floor, let your hands and forearms flop out either side of you so that they rest on the floor, palms facing up, your arms each forming a V shape and your hands roughly at shoulder level. Adjust your position so that you are comfortable.
–
Coming to rest on the Earth takes around 20 minutes. It is not a passive process but an intentional movement of attention to notice and release places of tension where we resist the gravitational pull of the Earth on each of our cells and our tissues. The following can be used as a general guide but in a class you may be offered more specific instructions.
Slowly scan through your body, allowing your all the bones of your skeleton to rest on the Earth and your tissues to fall off the bones, gently inviting any tension to release by recognising which way is down.
As you breathe, scan the lower surfaces in contact with the floor, noticing how they move.
With your breath, notice how the upper surfaces that are not in contact with the floor move.
Invite the upper surfaces to fall with the breath towards the lower surfaces.
Let your attention dwell in the middle place between the upper and lower surfaces.
After around 20 minutes, allow your eyes to open gently. Allow light to come into your eyes so that you see without looking (you may want to investigate for yourself the difference between seeing and looking).
–
The cycle:
Slowly roll the big bowl-like surface at the back of your skull to one side and to the other. Do this a few times, maintaining your attention on the surface in contact with the floor. Feel how the weight of your heads rolls over the point of contact.
Variation: Initiate the rolling of your head from your eyes first. Allow yourself to feel the weight of the eyes throughout. How does this feel different?
Variation: With the sense (an image only) that the eyes rest on the inside surface of the back of the skull, can the eyes and the back of the head be connected as they roll? How does this feel different? How do you perceive the weight of the eyes and the head differently?
–
The next time you roll your head to one side let yourself see one of your hands beside you. Gently flex and extend the fingers to wake up the hand. Keeping the elbow on the floor as long as possible, bring the hand close to your mouth, across your face and reach to the other side, allowing the rest of your body to be taken into rolling on one side. Push that hand into the floor to initiate a roll back, again. Repeat a few times making sure the hand initiates and the rest of the body follows. Can you feel the weight of your hand and arms as you do this? If so, the easiest pathway will bring your hand and arm close to your head and torso as it comes over. Repeat on the other side.
–
Place your arm back on the floor and bring your head back to centre. Now push into one of your feet until the push rolls your pelvis a little. Let go of the push so that your pelvis gently falls back to rest in centre. Repeat a few times. Then repeat on the other side.
–
Combine these three movements in rolling from side to side. Do not try to engineer the combination, rather just noticing how the three movements might support you when you need it as you roll. Find the easiest way to do it, supporting yourself as you need. Feel the energy swirling around your spine as you roll and see how that can be released from the places you push into the floor into reaching from your periphery (hands, feet, head, tail).
–
Next time you roll to one side, push with the lower forearm so that your torso comes off the floor to sitting. Then fall down the other side onto your other side. Repeat a few times with the sense that you are still rolling, just in and out of the floor. Allow the crown of your head to describe a large inclined circle in space as you move. See if you can coordinate the flexion and extension of your limbs to support you to move with ease as you rise and fall. A flexed limb can give you a base of support on the floor. An extended limb can take you out into space. Note the flexion of limbs on one side and extension of limbs on the other – the homolateral pattern.
–
Find yourself sitting with your legs extended in front of you. Flex at your hips to bring your torso over your thighs. You can reach gently forward with your arms and eyes if it is comfortable. Find rest in extending up your spine as far you can go.
–
Roll yourself backwards slowly, head coming last. Try not to lock the front of your trunk with your abdominal muscles but allow it to be flexible and soft as you come down vertebra by vertebra. Use your elbows and forearms on the floor beside you to support your weight if you need.
–
Sweep your arms along the floor so that they extend beyond your head. You form an X on the floor. In turn, extend from each of the four limbs and enjoy the stretch. Then extend along a diagonal, from a hand and the opposite foot, then switching to the other diagonal.
–
From your X, soften the tone in the lateral part of one side of the trunk and limbs to bring yourself rolling over and in to a C shape on that side. Allow limbs to sweep along the floor in arcs and fold softly at knees and elbows. Then soften in the other side to bring yourself back to an X and through to a C on the other side. Repeat a few times.
Variation: Instead of initiating the roll via a softening on the same side, initiate it via a reaching from the limbs on the opposite side, bringing you over and in. Come back via a reach as well. How does this feel different?
Variation: Combine the reaching on one side and a softening on the other side as you need. How does this feel different?
–
From lying on your back, bring your knees up over your torso gently and slowly. Then slowly reach with your feet up over your head to the floor beyond, gently and gradually curling your spine as you do so. Reach up with your arms towards your toes.
–
Bring your arms back down behind you and bend your knees so that then now are close to your ears allowing your feet and lower legs to be resting or close to a and parallel with the floor.
Slowly uncurl your spine, gradually bringing yourself back to lying on the floor.
–
With feet flat on the floor and knees bent, rock your pelvis up and down on the floor a few times. Then see how reaching from your tail can bring your pelvis off the floor, with a push from your feet into the floor supporting you, then set it back down. Then repeat but continue once your pelvis is off the floor, lifting your entire spine, vertebra by vertebra until your trunk forms a plank from your hips to your shoulders. Slowly bring yourself down vertebra by vertebra.
Variation: Try it with attention on the details of where you push into your feet. Pushing into your toes to bring your tail up, your heels to bring your pelvis up and your arch to bring your organs and ribs up.
–
Place your hands on the floor just above your shoulders with fingers pointing down your body and elbows above them in the air. Push into feet and hands to bring your whole body off the floor in an arc. Allow your head and tail to hang as your centre moves up. Gently bring yourself down.
–
Extend your arms along the floor at the level of your shoulders, resting palms up. Keeping your spine long, float your knees up until they are over your belly. Use as little effort in the big muscles of the legs as possible, keeping the hip joints open and loose and the knees loose and floating. Do not clamp the knees together or to your torso. Roll one knee to one side until it rest on the floor and roll the other leg over it, extending it towards the palm on that side. Roll your head to the opposite side to look towards the palm on that side. Pay attention to the double spiral from your legs into your torso up to your head rather than extending any further. Try to stay for a while, with ease. Roll your head to centre as you flex the extended leg and float your knees, one at a time to the other side, extending the trailing leg over to the palm on that side. Then roll your head to the other side, to look at the palm on that side. Again, attend to the double twist in your body. After a while, roll your head to centre and float your knees one at a time back to centre and down so that the soles of your feet rest on the floor, parallel, with space for another foot or so in between.
–
From this position, allow your knees to flop out to the sides, as far as they will go, letting your feet turn onto their lateral edges. Place your fingers on the tissues at the back of the top of your neck and base of the skull. Bring one heel close to the ipsilateral sitz bone of your pelvis, while extending the other leg away, both feet still on their sides. Draw the heel of the extended leg up towards its ipsilateral sitz bone while simultaneously pushing the other heel away, all the while, keeping the feet parallel and on their sides. I imagine that the feet are in parallel tracks, extending from the skull, through the sitz bones, down to where the feet would be when standing. Reverse and repeat three times on each side, noticing the connection between the heels and the ipsilateral sitz bones, and the connection all the way up the spine to the base of your skull.
–
From where you end up, extend one leg. Bring the other foot behind the knee of the extended leg and roll the flexed leg over the extended leg until the knee touches the floor, or as far as it will go. Support the folding over with the ipsilateral hand, keeping the other hand behind the neck. Breathe into the twist up your spine. Reverse and do the same on the other side.
–
Extend your legs, place your arms extended out to your sides and relax into the floor again.
Raise one leg up in full extension as far as it will go, towards a position where the foot is vertically above the ipsilateral hip joint. Do not strain but rather just go as far as you can, comfortably. Keep the rest of your body on the floor, including the other leg and do not arch your back to lift your leg.
Keeping the leg extended, rotate it in a big arc around the other leg until it touches the floor, allowing your torso to rotate as needed. At the same time allow the extended arms to ‘windmill’ around – maintaining extension and pointing in opposite directions from each other, with the arm on the ipsilateral side to the leg you raised going down to the legs and the other going up past the head. You will be turning onto your side. Allow the leg that rolled over the top now to turn an arc along the floor, still extended, until it is parallel to the other leg, while the lower arm comes past your leg in an arc to the side until it starts to come up towards the head. Then fold both arms at the elbow until the hands can be palm-down near the head. By now you will be almost on your front. At the same time, extend the spine and push into the hands to lift up your upper body as far as it will go, leaving the front of your pelvis on the floor and extending your legs away from you. Extend by pushing through the arms rather than pulling from the head. Let the head go only as far as you can without excessively tonifying the muscles of the back. Stay for a while and then release the arms and reverse the arcs until you are back to the start. Now do the same on the other side. Pay attention to the arcs in space that the hands and feet take, extending as far as possible as they do.
–
From your back, with your arms by your sides, lift your back off the ground, starting from the head and extending through the spine until you can rest on your elbows. Then rotate your lower arm on one side to the side and as you do so turn your body over it bringing your other arm over until you are resting on your elbows, lower arms on the floor with palms down, front towards the floor, in a plank position. Tuck your toes in and extend through your spine, looking between your hands. Breathe and stay for as long as is comfortable. Slowly lower yourself to the floor.
–
From lying on your front on the floor, keep your head down, forehead near the floor. Ground in your abdomen. Raise and extend one arm, with the sense that it is reaching from your centre through to your fingertips. At the same time raise and extend the contralateral leg, reaching from your centre through to your toes. Support yourself if needed with the other arm and leg on the ground. Observe the spiral in your torso. Only raise a few inches off the ground. Extension is more important than height. Try not to put in any excess effort. Pay attention to the diagonal fold in your middle and softening it. Relax. Do three times and then do the same on the other side.
Variation: Try to raise from the periphery instead, reaching from the fingers and toes. How is this different?
–
Roll onto your back with limbs extended – arms extended above your head. Place one hand on your ear with the elbow of that arm floating up in the air. Float up the contralateral knee. Gently bring the knee and elbow together. They do not need to meet or even move very much – have only the intention for them to come together. Meanwhile, allow an extension along the other diagonal. Repeat two or three times and then do the same on the other side.
Variation: Instead of bringing the elbow and knee together, can you make a diagonal fold in your centre that brings them together? How is this different?
Variation: In doing this movement, observe how the head might follow the movement. Can you also lead from the head? How is this different?
–
From lying with arms above the head and legs long, bring the heel of one leg close to the pelvis, flexing at the knee while keeping it on or low to the ground. Then roll to that side and sweep the arms around and up to sitting with one leg long and the other foot close to the pelvis and tucked in close to the straight leg – it should end up this way without the need for much adjustment.
Then gently bring both arms out towards the toes of the outstretched leg, also extending the spine and looking beyond the leg into the distance. Stay mobile while stretching for a few moments. Do not over-stretch and be careful not to strain your lower back. Stay just a little longer than you might. Then switch to the other side and do the same, either by reversing the roll to the floor and over to the other side or simply by switching in sitting. With both of these (and throughout this cycle) try to stay away from ‘yoga-mind’ even though these postures might resemble yoga postures. The intention is different and the emphasis is not on achieving a posture but in moving fluidly and no further than is comfortable.
–
In sitting, bring the soles of the feet together with knees flexed and low to the floor. Root into the floor with your tail and to the sky with the crown of the head. Stay for a few moments.
–
From this sitting position, extend both legs out to either side, as wide as is comfortable. Stay sitting with the tail rooting into the floor. If you rock back on your pelvis, then narrow the distance between the legs a little.
–
From this position roll to the right until you are on the front of your leg and your spine extends up to the sky, flexing the right leg at the knee and tucking it under the pelvis while the other leg extend backwards. Stay for some moments and then reverse the roll all the way to the same position on the other side, with the left leg now tucked under. Stay for a few moments before starting to roll back.
–
As you roll, fold both legs in until you rest on your flexed legs and your spine drapes over them, your forehead resting on the floor in front and your arms flowing our around your head to the front (like a ‘child pose’).
–
Start dropping your tail towards the floor and let it take your spine in that direction, vertebra by vertebra until you come to kneel sitting, your spine vertical. Use your hands and arms to support you on the way up but let the movement come from the spine.
–
Extend at the knees and hips until you come to standing on your knees, forelegs along the ground and your upper legs and torso vertical.
–
Reach up with your sternum and behind with you arms, as if reaching around a big ball on your forelegs so that you bend back, if you can taking your hands to your ankles. Stay for a few moments before reversing and coming back to kneel sitting.
–
Optional. Only if you can, from kneel sitting, drop your pelvis between your feet and then extend and the pelvis so that your torso curves back and your head rests on the floor behind you. Use your arms to support you and to come up and back to kneel sitting. Do not do if this is difficult or you have problems with your lower back.
–
Come down again into a ‘child pose’ with knees under you and your spine draped over your legs so that your head rests on the floor in front.
–
Bring your arms along the floor, close to your head and just a little in front. Start to push from your feet and tail and let the push ripple up your spine, pushing towards the crown of your head, which pushes into the ground. Use your arms you support you. Then push back from the head all the way to the tail and returning you to being draped over your folded legs. Repeat a few times, keeping the movement as fluid as possible.
–
Come to all-fours, standing loosely on hands and knees. Do not spread them too wide – the hands should be approximately under the shoulders with the elbows in between the hands and shoulders, not out to the sides, and loose rather than locked, and the knees should be approximately under the hips – this may be narrower than you think. Do not drop your head but you can relax your eyes and look at the floor between your hands. Keep your joints loose so you feel a fluidity in standing on all-fours.
Send a push from your tail to your head which rocks you forward a little – as if a dog had bumped you along from behind. Then send a push from your head to your tail, rocking you back a little – as if a dog had bumped you from your head. Repeat a few times. Then continue sending a push along your spine but notice how at the other end you can reach as well to take you a little further in your rock – from a push at your tail your head can reach forward and from a push at your head your tail can reach back. Notice the energetic difference when the reach is involved.
–
Come back to a stable but mobile all-fours position. Reach your tail down between your legs and allow it to take your spine into flexion, curving in an arc so that your head also points down and your kidneys rise up to the sky. Then reach from your tail towards the sky and allow it to take your spine into extension, reversing the curve from before. Repeat a few times, gently and fluidly.
–
Come back to a stable but mobile all-fours position. Let your eyes look to the left, taking your head and neck into rotation. Then move to do the same to the right. Feel the twist in the upper part of your spine and perhaps elsewhere. Repeat a few times.
–
From a stable but mobile all-fours position, now reach your left elbow back parallel to your body until it rests on the floor while at the same time twisting your spine to face right. It should be fairly fluid and easy with the twist in your mid-spine. Then do the reverse, with the right elbow coming to the floor and you facing left. Repeat a few times on each side.
–
Returning to a stable but mobile all-fours position, reach your right arm perpendicular to your body through between your left arm and left leg, so that your little finger side is on the floor and your palm faces behind. As you reach your right shoulder will come through to the floor and you will be looking left. Then reverse and do the equivalent on the other side. Repeat a few times. Feel the twist in your mid-to-lower-spine.
–
From a stable but mobile all-fours position, start a gentle rotation of your upper spine clockwise along its axis so your head moves in a clockwise circle. Do not just move your head but centre the rotation in the mid-spine. At the same time, rotate your lower spine counter-clockwise so that your tail describes a counter-clockwise circle. Do it gently. Feel how your middle moves in spirals, up and down and from centre to head and tail. Then reverse the direction.
–
From all fours, tuck your toes under and push from your feet and hands and your head and tail until your tail reaches up to the sky (looking like a downward-facing dog in yoga). Feel the support from your adrenal glands to radiate out to your arms, legs, head and tail.
–
From here, reach your head down and then up through your arms to the sky, letting yourself rest on your feet and your legs hang as your spine extends. Try not to brace your arms but keep them loose and mobile.
–
Lower your knees until you can rest them on the floor. Walk your hands back until you are half-squatting with hands on the floor in front of your feet. Rock from hands to feet and back a few times. Notice that pushing into your hands you can find your tail moving down and pushing into your feet you can find your head moving up. Feel the support of your belly in between these triangles.
–
Rest back into a deep squat (only if you can do this comfortably) with feet on the floor, and arms resting around the legs with hands on the floor. Let your head fold in. Feel your breath filling you up and leaving you, as if from your feet. Feel, if you can, the slight extension and flexion of your spine when inhaling and exhaling. Can it be the other way round too?
–
Drop your head towards the floor and let it pull your tail into the air so that you are standing bent over, still with feet flat on the ground and spine hanging down from your tail. Use your hands for support if you need. Do not try to bring your head against your legs unless it is easy. Bend your knees as you need to. Stay for a few moments.
Place your hands gently on the floor and rock a little from your feet to hands and back.
–
Place a hand, palm facing up through the gap between the other foot and hand and let it twist your body gently so that you can look to that side between your leg and arm. Stay for a few moments and then do the same on the other side.
–
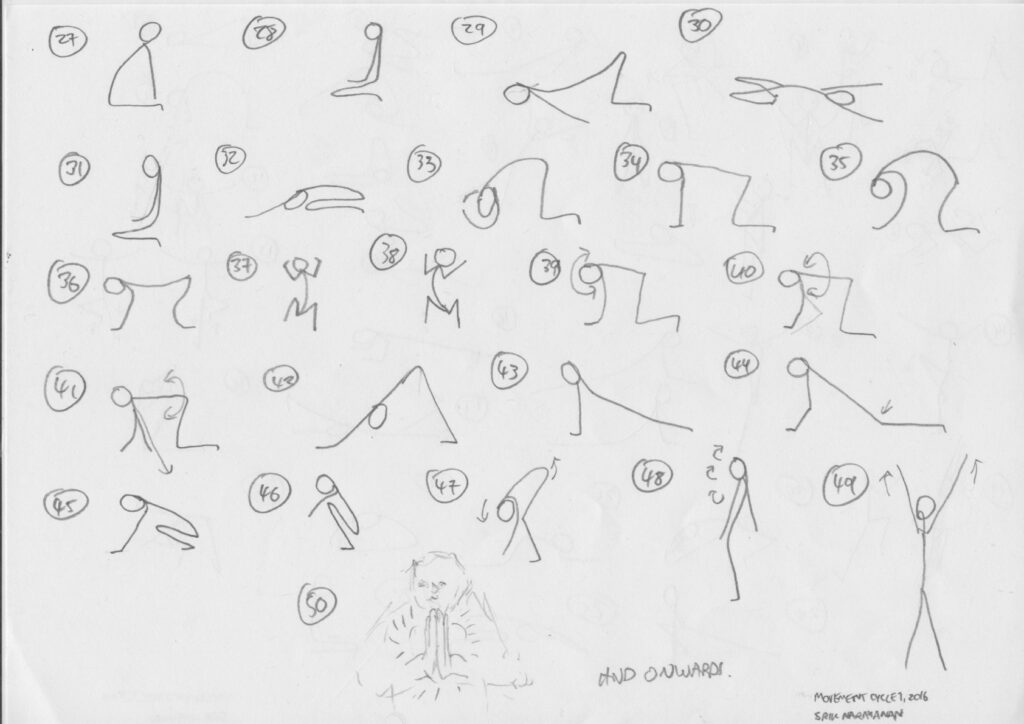
From hanging over, drop your tail to the floor and let it bring your spine to the vertical, vertebra by vertebra with your head last to come up. At the same time straighten your legs without locking the knees. Allow your breathing to take you up.
See what is in front of you. Enjoy this verticality.
From vertical, let your arms float up on either side, rotating as they do so your palms face the sky and move towards each other as your hands reach into the sky. When your palms meet above your head bring them down your midline in front of you and to hanging at your sides again. Repeat a few times.
–
You are now standing vertical, supported by your structure on the Earth. This is a significant developmental milestone for infants. Enjoy this moment as you take your first steps into the rest of your day and, if you wish, come back to it during the day.